NEWS
News information
Subcategory:
When we discuss the performance of a Vision Measuring Machine (VMM) or a high-end CNC machine tool, the conversation often revolves around the lens quality or the software interface. However, at Dongguan City Handing Optical Instrument Co., LTD., we know that the unsung hero of precision is the feedback system—specifically, the optical linear encoders. As a premier manufacturer of both Video Measuring Systems and the linear scales that power them, we want to share technical insights into how these components define the accuracy of your equipment.

1. What are Optical Linear Encoders?
In simple terms, optical linear encoders (often called linear scales) are sensors that convert position into an electrical signal. They act as the "nervous system" of any automated machinery. Whether it is a Manual Video Measuring Machine requiring a digital readout or a fully Automatic Video Measuring Machine, the system needs to know exactly where the stage is located in real-time.
The principle involves a light source passing through (or reflecting off) a scale grating—a glass or metal ruler with microscopic lines engraved on it. A reading head moves along this scale, detecting the fluctuations in light intensity as it passes the lines, converting these into position data.
2. Exposed vs. Enclosed Linear Encoders: Making the Right Choice
One of the most frequent questions we receive is regarding the difference between exposed linear encoders and enclosed ones.
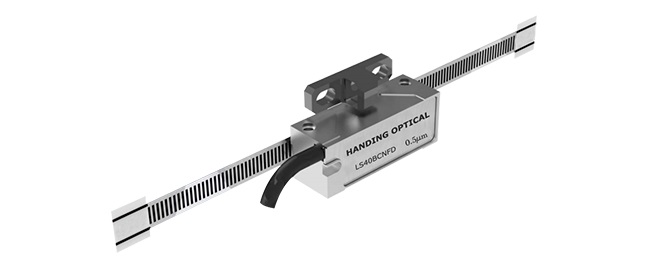
***Exposed Linear Encoders: These consist of a scale tape or glass spar and a non-contact scanning head. There is no friction, allowing for extremely high traversing speeds and zero mechanical backlash. They are the gold standard for high-precision applications like semiconductor manufacturing equipment, linear motor drives, and ultra-precise Vision Measuring Machines operating in cleanroom environments. Because they are "exposed," they offer the highest accuracy but require a clean environment.
***Enclosed Linear Scales: Here, the scale is protected inside an aluminum extrusion with sealing lips. The reading head is guided within this housing. These are the robust workhorses found on CNC milling machines, lathes, and Bridge-type Video Measuring Machines used on the shop floor, where coolant, dust, and chips are present.
3. Incremental vs. Absolute Encoders
Another critical distinction for machine builders and retrofitting engineers is the signal type.
***Incremental Encoders: These provide relative position. When the machine is turned off, it "forgets" where it is. Upon startup, the machine must perform a "homing" sequence to find a reference mark. They are cost-effective and widely used in standard VMS units.
***Absolute Encoders: These provide a unique digital code for every position on the scale. If the power is cut and the axis moves, the encoder knows its exact position immediately upon power-up without moving. This is crucial for high-safety automation and advanced CNC Video Measuring Machines where homing might be risky or time-consuming.
4. The Role of Encoders in Video Measuring Machines
In our Video Measuring Instrument product line, the quality of the linear scales directly correlates to the volumetric accuracy of the machine. For instance, in our 3d Video Measuring Machine, we utilize high-precision optical encoders with resolutions down to 0.1µm or even 0.05µm.
Why does this matter? Because a vision measuring instrument is only as accurate as its ability to track movement. If the camera sees an edge, but the scale reports the wrong position due to thermal expansion or signal noise, the measurement is flawed. That is why we use scales with low coefficients of thermal expansion and advanced signal processing to minimize interpolation errors.
5. Beyond Linear: Rotary Encoders
While linear measurement handles X, Y, and Z axes, many complex metrology tasks require angular measurement. This is where Rotary encoders and angle encoders come into play. Used in rotary tables or articulating probe heads on a Coordinate Measuring Machine, these encoders ensure precise angular positioning, allowing our customers to measure complex geometries like turbine blades or helical gears.
6. Sourcing Quality Components At Dongguan City Handing Optical Instrument Co., LTD., we not only build complete machines but also supply high-quality linear encoders and encoders to the global market. Whether you are an OEM building a new motion stage or an end-user looking to retrofit an old Manual Video Measuring Machine, choosing the right scale is paramount.
We test every reading head and scale under strict conditions to ensure signal stability and durability. Our technical team can assist you in selecting the correct voltage (5V/24V), output signal (TTL/RS422), and resolution for your specific application.
7. Summary
Precision is not an accident; it is the result of high-quality components working in harmony. By understanding the technology behind optical linear encoders, you can make better decisions for your quality control equipment. We invite you to explore our full range of Optical Measuring Systems and components.
For technical specifications, installation guides, or pricing on our scales and VMM systems, please contact our international sales team.
Contact Us:
Email: handing3d@163.com
Han Ding offers a one-stop service from needs analysis, product solutions, usage guidance, to after-sales tracking

Address:No. 98, Zhen'an East Road, Chang'an Town, Dongguan City, Guangdong Province, China
Mobile:+86-130 3887 8595 / Aico Ding
Email:handing3d@163.com